
- Published on
Building a Retro-Gaming Machine and Home Media Center
Store your favorite video games, movies, TV shows, and music and play them everywhere you go
- Authors

- Name
- Mike Tsamis
Here is a fun, easy and useful project where you can watch movies and TV shows, view pictures, listen to music, and play video games from various retro gaming consoles on your raspberry pi. To do this, we will use the RetroPie OS and install Kodi on it.
Materials:
- Raspberry Pi Zero W
- Power adapter
- MicroSD Card with at least 16gb of space
- Mini HDMI to HDMI Cable
- A video game controller (preferably for an Xbox 360, PS3, or PS4)
Step 1: Installing the OS
For this project, we will be using the latest version of RetroPie. Make sure you download the correct image that matches the raspberry pi model you are using. For this tutorial, I chose the Raspberry Pi Zero W since it's currently the smallest, cheapest, and most lightweight one of the bunch. So, in this case, download the "Raspberry Pi 0/1" image. To write the OS image onto the MicroSD card, follow these installation instructions provided by RaspberryPi.org. Once done, plug in the MicroSD card.
Step 2: Configuring the Raspberry Pi Zero W and OS
Note that the Raspberry Pi Zero W uses a Mini HDMI input instead of a standard, so plug in your Mini HDMI to HDMI cable into the raspberry pi and your TV. In addition, the Raspberry Pi Zero W uses two USB Mini-B SMD connectors. One is used to plug in a single USB device (in this case, your controller) and the other for the power adapter. Make sure you are plugging the correct device into the correct port. The port for the power adapter is clearly labeled on the pi as "PWR IN" while the other port is labeled "USB".
Once you've booted the raspberry pi, you should see a welcome screen where you can configure your controller. Follow the on-screen instructions. When that's done, you will see the EmulationStation homescreen. RetroPie has many built-in emulators including the NES, SNES, Sega Genesis, Game Boy, PS1, N64, etc. See the full list of supported game consoles here.
Next, let's connect the raspberry pi to our WiFi network. Start by turning off the raspberry pi and removing the MicroSD card. Plug the MicroSD card into your computer and open the boot partition. In this parition create a text file and call it "wifikeyfile.txt". Enter the following in the file:
ssid="YOUR_WIFI_NETWORK_NAME_HERE"
psk="YOUR_WIFI_NETWORK_PASSWORD_HERE"
Save this file, remove the MicroSD card, plug it into your raspberry pi, and reboot. In the RetroPie Configuration menu, select "WiFi" and then select the "Import wifi credentials from /boot/wifikeyfile.txt" option. Your raspberry pi should now be connected to your WiFi network. Next, let's enable SSH so that we can remotely connect to the machine and transfer files. To do this, in the RetroPie Configuration menu, select "RASPI-CONFIG". Select "Interfacing Options" then "SSH" and enable it.
Step 3: Adding and Playing Games
Due to legal reasons which vary from country to country, I will not be providing any links where you can obtain the games you can play on your RetroPie's emulators (which are called "roms"). However, it's not hard to find them with a quick Google search. Once you've obtained the roms you wish to play, you can transfer them via SFTP. For Windows, you can use WinSCP and for Mac, you can use Cyberduck to transfer your files. Follow their instructions on how to connect to the raspberry pi. Note that the default username and password to connect to the raspberry pi remotely is "pi" and "raspberry". You can change the username/password to be more secure in "RASPI-CONFIG" and selecting the first option "Change User Password". In addition, you can get the IP address of your raspberry pi by selecting "Show IP" in the RetroPie Configuration menu.
Once you're connected to the raspberry pi via WinSCP/Cyberduck, navigate to the "/home/pi/retropie/roms" directory and place your roms in the folder that matches the emulator console. For example, if you have an NES rom, place it in the /nes directory. After transfering your roms, the emulator consoles and games should now show up in the RetroPie where you can play them.
Step 4: Installing Kodi
Next, we are going to install Kodi which is an open source home theater software. This is where you can play and stream music, movies, tv shows, and more. Fortunately, RetroPie supports and includes Kodi as an optional package. To install it, navigate to the "RetroPie-Setup Screen", select "Optional Packages" and then select Kodi. Installing it will take a few minutes. Once installed, Kodi will appear under the Ports section of the RetroPie homescreen.
Step 5: Configuring Kodi
There are many powerful add-ons for Kodi which will allow you to stream movies, music, radio, TV shows and more. Feel free to navigate to the "Add-ons" section and install add-ons that interest you. In this guide, I'll only be covering how to add your own movies from your PC to Kodi, but the instructions for other types of media is very similar.
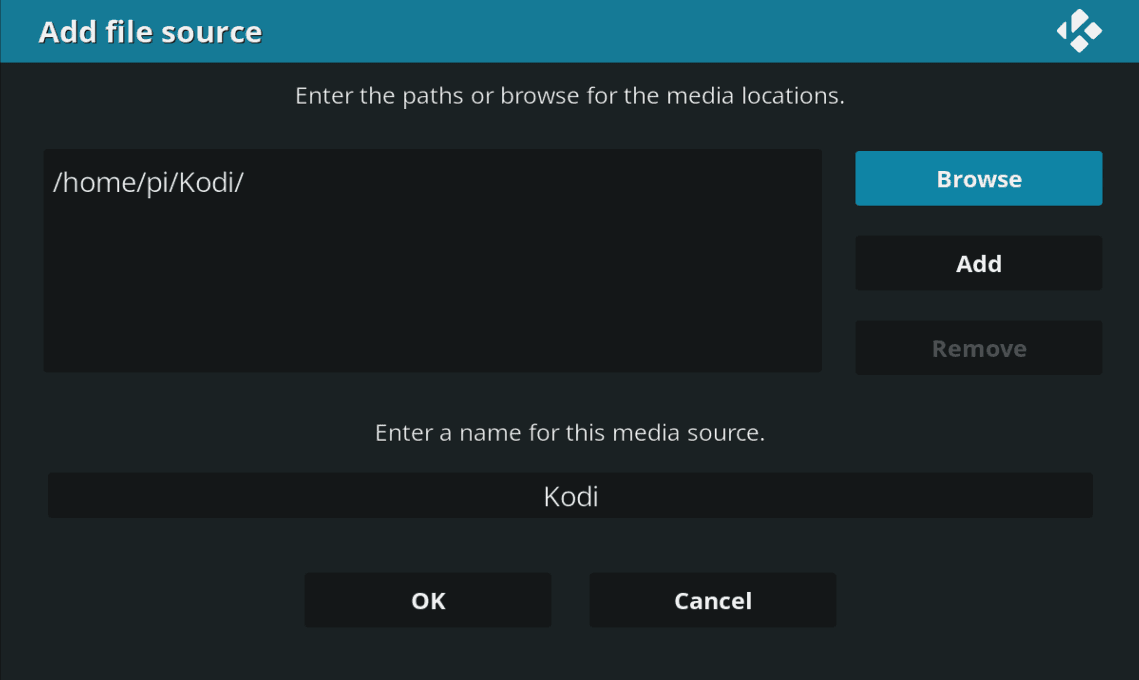
Start by connecting to the raspberry pi via WinSCP/Cyberduck and navigate to the "/home/pi" directory. Here, create a new folder called "Kodi". In this folder, I suggest creating subdirectories for your movies. Move the files from your PC to the appropriate directories you created in the raspberry pi. Once complete, in Kodi, navigate to "Movies" and select "Enter files section". From here, select "Add videos". Select the "Browse" button and then select the directory "/home/pi/Kodi".
After selecting the source, you can then set the content type. Set it to "Movies" and set the following other configurations:
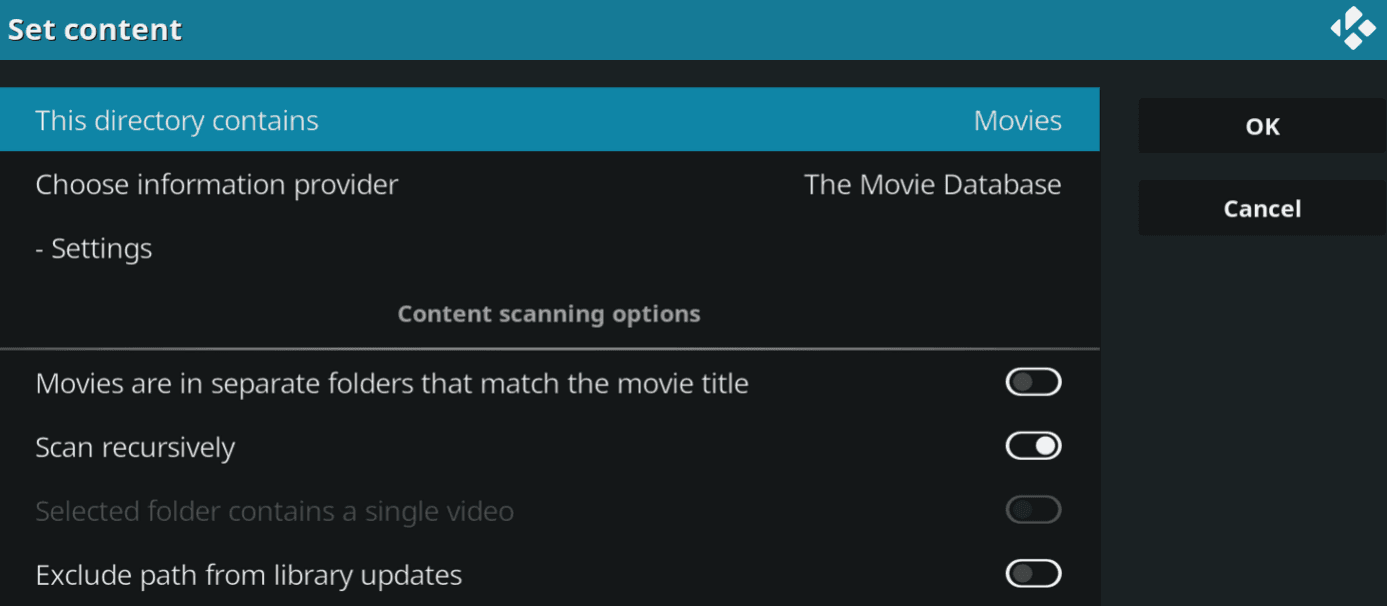
After this is done, Kodi will begin scanning the movies and adding them to the library. Once this is done, you can access the movies you added in the Movies library of Kodi.
And that's it! You now have a very lightweight and portable home media center with multiple video game emulators. Enjoy!