
- Published on
Building a Portable VPN Router with an Ad Blocker
Browse the web anonymously and block ads anywhere
- Authors

- Name
- Mike Tsamis
With the recent WiFi KRACK exploit and lawmakers allowing ISPs to sell your data without consent, it is becoming increasingly important to protect both our data and basic right to privacy. Having a VPN and ad blocker can help accomplish this. Using a VPN encrypts all data between you and the internet which can protect you from having your personal information compromised by hackers, third parties, your ISP, or even government surveillance. You can also use a VPN to manipulate your IP address, making your traffic appear to be coming from another country. This can allow you to bypass a country's web censorship and surveillance. In addition, an ad blocker not only prevents ads from rendering on websites you visit which makes your browsing experience faster, but also stops ad servers from tracking you and malicious ads (known as malvertising) from installing malware on your computer. Using an ad blocker on your phone can also help you save on your data plan since your phone will ignore downloading any ads.
For this project, I wanted to build a portable VPN router with an ad blocker that can support multiple devices. With this setup, I can take the router anywhere I go and browse the web safely at any cafe/hotel/public WiFi hotspot with confidence. I can also connect my PC, laptop, phone, or any other device to it as well.
Materials:
- Raspberry Pi B
- Power adapter
- MicroSD Card with at least 4gb of space
- Two USB WiFi adapters
- A second computer to install the Raspberry Pi OS and to SSH into the Raspberry Pi to configure it remotely.
- A VPN subscription. In this tutorial, I'll be using Private Internet Access which is only $3.33 per month.
Step 1: Installing the OS
Download the latest non-desktop version of Raspbian. Follow their installation guide on how to write the OS image onto the MicroSD card. Once done, plug in the MicroSD card, the two WiFi adapters, your keyboard, monitor, and power adapter into the Raspberry Pi which will automatically boot the OS. Follow the
Step 2: Configuring the OS
Upon booting your Raspberry Pi for the first time, you will be prompted to log in. Enter the default username and password:
Username: pi
Password: raspberry
Once logged in, run the following command:
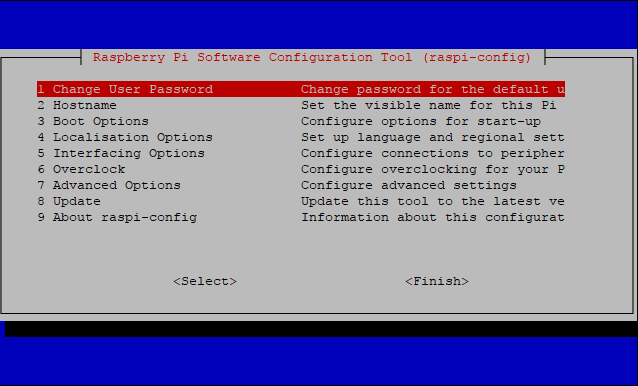
sudo raspi-config
This will open the OS's configuration tool. Here, you should change the following:
- The username and password
- Select the correct timezone and keyboard mapping for your region
- Configure the Memory Split to give 16Mb (the minimum) to the GPU
- Enable SSH
Step 3: Creating a WiFi Access Point
The strategy here is to be able to connect any of our devices to the raspberry pi which will be connected to your WiFi network. We'll use hostapd to make the raspberry pi a WiFi access point and dnsmasq as our DNS/DHCP server.
Rasbian has dhcpcd handle interfaces by default. We do not want it to handle wlan0 since we will be setting it to a static IP address. Let's edit dhcpcd's configuration file by running sudo nano /etc/dhcpcd.conf. In the text editor paste denyinterfaces wlan0 at the end of the file and save.
Now, we can configure wlan0 to have a static IP address. Edit that configuration file by running sudo nano /etc/network/interfaces. Edit the wlan0 section of the file to look like this:
allow-hotplug wlan0  # detect 1st WiFi adapter
iface wlan0 inet static  # create static address for access
  address 172.24.1.1
  netmask 255.255.255.0
  network 172.24.1.0
  broadcast 172.24.1.255
  #    wpa-conf /etc/wpa_supplicant/wpa_supplicant.conf

allow-hotplug wlan1 # detect 2nd WiFi adapter
iface wlan1 inet dhcp # connect WiFi with DHCP
  wpa-ssid "yourhostnetwork" # Your WiFi access point name here
  wpa-psk "yourhostpassword" # Your WiFi access point password here
  #    wpa-conf /etc/wpa_supplicant/wpa_supplicant.conf
After saving, restart dhcpcd, wlan0, and wlan1:
sudo service dhcpcd restart
sudo ifdown wlan0
sudo ifup wlan0
sudo ifdown wlan1
sudo ifup wlan1
Time to configure hosapd. Edit the configuration file with sudo nano /etc/hostapd/hostapd.conf and add the following to the file:
# This is the name of the WiFi interface we configured above
interface=wlan0

# Use the nl80211 driver with the brcmfmac driver
driver=nl80211

# This is the name of the network
ssid=PiFi

# Use the 2.4GHz band
hw_mode=g

# Use channel 6
channel=6

# Enable 802.11n
ieee80211n=1

# Enable WMM
wmm_enabled=1

# Enable 40MHz channels with 20ns guard interval
ht_capab=[HT40][SHORT-GI-20][DSSS_CCK-40]

# Accept all MAC addresses
macaddr_acl=0

# Use WPA authentication
auth_algs=1

# Require clients to know the network name
ignore_broadcast_ssid=0

# Use WPA2
wpa=2

# Use a pre-shared key
wpa_key_mgmt=WPA-PSK

# The network passphrase
wpa_passphrase=raspberry

# Use AES, instead of TKIP
rsn_pairwise=CCMP
After saving, lets test that the WiFi network we configured is being broadcasted. Run this command:
sudo /usr/sbin/hostapd /etc/hostapd/hostapd.conf
You should now see PiFi as a WiFi network option to connect to. However, once you connect, you will not be able to connect to the internet. We'll configure that next. Press Ctrl + C to stop hostapd. Make hostapd start up automatically every time we boot the raspberry pi by editing the default configuration file with sudo nano /etc/default/hostapd. Look for DAEMON_CONF="" and set it to "/etc/hostapd/hostapd.conf" and save. We can now configure dnsmasq. By default, dnsmasq has a lot of configurations set that we do not need for this project. Rename the original file and create a new file with the following commands:
sudo mv /etc/dnsmasq.conf /etc/dnsmasq.conf.orig
sudo nano /etc/dnsmasq.conf
Paste the following in the text editor:
interface=wlan0                         # Use interface wlan0
listen-address=172.24.1.1               # Explicitly specify the address to listen on
bind-interfaces                         # Bind to the interface to make sure we aren't sending things elsewhere
server=8.8.8.8                          # Forward DNS requests to Google DNS
domain-needed                           # Don't forward short names
bogus-priv                              # Never forward addresses in the non-routed address spaces.
dhcp-range=172.24.1.50,172.24.1.150,12h # Assign IP addresses between 172.24.1.50 and 172.24.1.150 with a 12 hour lease time
After saving this file, we need to enable IPV4 forwarding so that web traffic can flow between our devices and the WiFi network. To do this, lets edit sysctl.conf by running sudo nano /etc/sysctl.conf. Here, we are going to uncomment (remove the #) the line that states net.ipv4.ip_forward=1. After saving, activate it, with the following command:
sudo sh -c "echo 1 > /proc/sys/net/ipv4/ip_forward"
We can now set up our raspberry pi to share its internet access to any devices that connect to it by configuring a NAT between our wlan0 interface and wlan1 interface. Execute these commands to add iptable rules:
sudo iptables -t nat -A POSTROUTING -o wlan1 -j MASQUERADE
sudo iptables -A FORWARD -i wlan1 -o wlan0 -m state --state RELATED,ESTABLISHED -j ACCEPT
sudo iptables -A FORWARD -i wlan0 -o wlan1 -j ACCEPT
We are going to modify these rules again later on once we configure the VPN, but for now, run sudo sh -c "iptables-save > /etc/iptables.ipv4.nat" to save these rules. Next, we want these rules to apply every time the raspberry pi boots. To do this, run sudo nano /etc/rc.local and add the line iptables-restore < /etc/iptables.ipv4.nat right above the line that states exit 0. Let's now run hostapd and dnsmasq.
sudo service hostapd start
sudo service dnsmasq start
At this point, you should now be able to connect any device wirelessly to the raspberry pi and browse the internet provided by your WiFi access point!
Step 4: Configuring the VPN Client
Install OpenVPN by running:
sudo apt-get install openvpn
Next, download and unzip the OpenVPN profiles from Private Internet Access:
wget https://www.privateinternetaccess.com/openvpn/openvpn.zip
unzip openvpn.zip -d openvpn
Copy the profiles and certificates with these commands:
sudo cp openvpn/ca.rsa.2048.crt openvpn/crl.rsa.2048.pem /etc/openvpn/
sudo cp openvpn/US New York.ovpn /etc/openvpn/US.conf
Lets now enter our login credentials for Private Internet Access. Run sudo nano /etc/openvpn/login and enter your username in the first line and your password in the second line. Save this file and run sudo nano /etc/openvpn/US.conf where we can configure OpenVPN to use Private Internet Access. Change these lines:
auth-user-pass
ca ca.rsa.2048.crt
crl-verif crl.rsa.2048.pem
To:
auth-user-pass /etc/openvpn/login
ca /etc/openvpn/ca.rsa.2048.crt
crl-verif /etc/openvpn/crl.rsa.2048.pem
Reboot your Raspberry Pi at this point. Afterwards, test the VPN by running sudo openvpn --config /etc/openvpn/US.conf and ensure that you connect with no errors. After testing, press __Ctrl + C __ to stop the connection and enter sudo systemctl enable openvpn@US to make OpenVPN run automatically on boot. Now, we have to add more iptable rules:
sudo iptables -A INPUT -i lo -m comment --comment "loopback" -j ACCEPT
sudo iptables -A OUTPUT -o lo -m comment --comment "loopback" -j ACCEPT
sudo iptables -I INPUT -i wlan1 -m comment --comment "In from LAN" -j ACCEPT
sudo iptables -I OUTPUT -o tun+ -m comment --comment "Out to VPN" -j ACCEPT
sudo iptables -A OUTPUT -o wlan1 -p udp --dport 1198 -m comment --comment "openvpn" -j ACCEPT
sudo iptables -A OUTPUT -o wlan1 -p udp --dport 123 -m comment --comment "ntp" -j ACCEPT
sudo iptables -A OUTPUT -p UDP --dport 67:68 -m comment --comment "dhcp" -j ACCEPT
sudo iptables -A OUTPUT -o wlan1 -p udp --dport 53 -m comment --comment "dns" -j ACCEPT
sudo iptables -A FORWARD -i tun+ -o wlan1 -m state --state RELATED,ESTABLISHED -j ACCEPT
sudo iptables -A FORWARD -i wlan1 -o tun+ -m comment --comment "LAN out to VPN" -j ACCEPT
sudo iptables -t nat -A POSTROUTING -o tun+ -j MASQUERADE
Save these rules again by running sudo sh -c "iptables-save > /etc/iptables.ipv4.nat". The portable VPN should now be fully configured, encrypting all network traffic between your devices and your internet service provider!
Step 5: Configuring the Ad Blocker
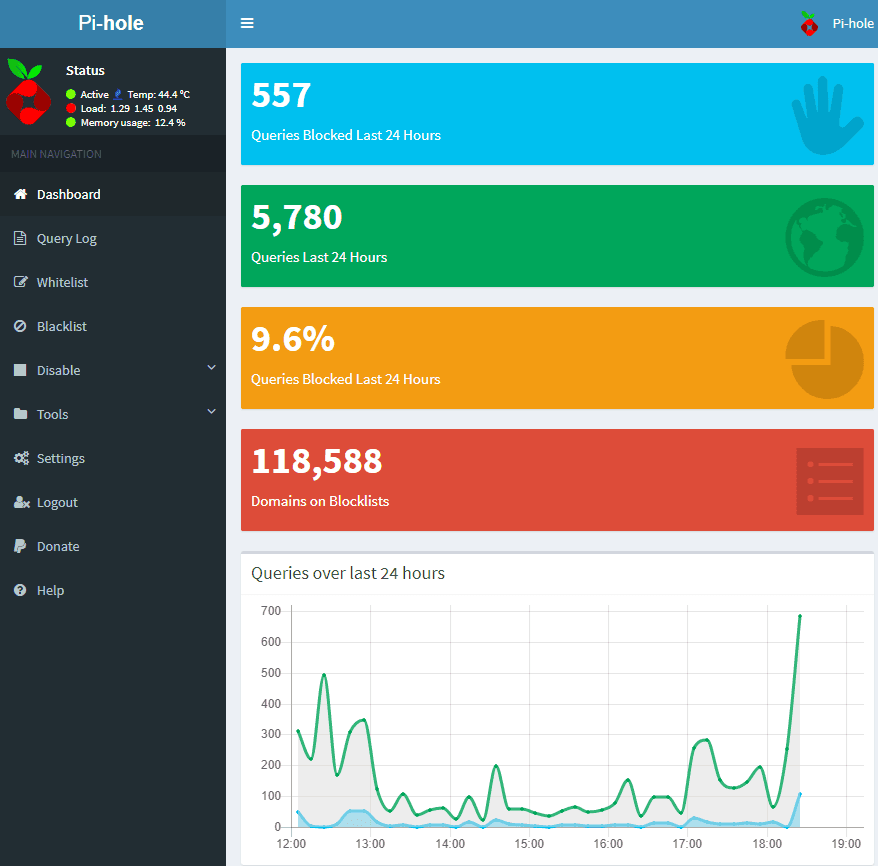
We are going to use Pi-hole as our ad blocker. Install Pi-hole with this command: curl -sSL https://install.pi-hole.net | bash. After installation, go to http://172.24.1.1/admin in your browser and log into Pi-hole. Here you'll have access to the Pi-hole dashboard where you can look at your ad blocking metrics, blacklist additional domains, or whitelist domains that should not be blocked.
And there you have it! You can now connect your laptop, phone, and any other devices to the raspberry pi and enjoy an ad-free secure internet connection wherever you go.